ASRock z87 Extreme4 - i5-4760K Step by step guide help
ASRock z87 Extreme4 - i5-4670K Step by step guide help
Could really use some help with this install.
I can install Mavericks, but it will not load without -v -f -x PCIRootUID=1 GraphicsEnabler=No
I used pmpatch and still get this
Also, can anyone provide the best multibeast settings for this MB?
Thanks!
Could really use some help with this install.
I can install Mavericks, but it will not load without -v -f -x PCIRootUID=1 GraphicsEnabler=No
I used pmpatch and still get this
Also, can anyone provide the best multibeast settings for this MB?
Thanks!
- Joined
- Feb 3, 2011
- Messages
- 1,403
- Motherboard
- Gigabyte Z390 AORUS Ultra
- CPU
- i9-9900K
- Graphics
- RX 590
u can try my guide only difference is z87 vs z77 lan and audio r different http://www.tonymacx86.com/mountain-lion-desktop-guides/96604-guide-asrock-z77-pro3-bios-1-90-patched.html
if using more then 4gb of ram for install use maxmem= amount of ram u
have minus 1gb example 16gb 15360 screenshots r for your mobo
Attachments
-
 177.8 KB Views: 1,052
 -
 157.7 KB Views: 789
 -
 114.4 KB Views: 746
 -
 149.8 KB Views: 728
 -
 131.7 KB Views: 735
 -
 157.2 KB Views: 731
- Joined
- May 11, 2011
- Messages
- 588
- Motherboard
- Asrock B365M Phantom Gaming
- CPU
- i5-8400
- Graphics
- UHD 630 + RX 580
- Mobile Phone

Go to Asrock and download the last bios for your motherboard because it let you install Mac Os X ")
Now they support Mac Os X install
Now they support Mac Os X install
Attachments
-
 174.2 KB Views: 1,775
- Joined
- Jan 18, 2014
- Messages
- 17
- Motherboard
- ASRock Z87 Extreme4 2.70 Bios
- CPU
- i5-4670K
- Graphics
- HD4600
- Mac

- Classic Mac
-
- Mobile Phone
-

- Joined
- May 11, 2011
- Messages
- 588
- Motherboard
- Asrock B365M Phantom Gaming
- CPU
- i5-8400
- Graphics
- UHD 630 + RX 580
- Mobile Phone
-
Are you using the HD4600 graphics?
Try npci=0x3000 or npci=0x2000 or -v -x -f or -F
Or IGPEnabler=Yes IGPlatformID=01660003 -v
Or this one works for everyone with hd4000 or 4600 --> GraphicsEnabler=Yes PCIRootUID=0 -v
Or you can include darkwake=0 see if works
Try npci=0x3000 or npci=0x2000 or -v -x -f or -F
Or IGPEnabler=Yes IGPlatformID=01660003 -v
Or this one works for everyone with hd4000 or 4600 --> GraphicsEnabler=Yes PCIRootUID=0 -v
Or you can include darkwake=0 see if works
- Joined
- Jan 18, 2014
- Messages
- 17
- Motherboard
- ASRock Z87 Extreme4 2.70 Bios
- CPU
- i5-4670K
- Graphics
- HD4600
- Mac
-
- Classic Mac
-
- Mobile Phone
-
ASRock Z87 Extreme4 bios 2.70- i5-4670K
What is interesting is the the ASRock website no longer shows the MacOSX compatible bios as shown above... http://www.asrock.com/mb/Intel/Z87 Extreme4/?cat=Download&os=BIOS
Yes using the 4600 graphics. Monitor plugged into DVI and just updated to the latest ASRock bios that supposedly supports Mac OSX. Have 8GB of ram and a samsung SSD.
This goes to black screen: Try npci=0x3000 or npci=0x2000 or -v -x -f or -F
This freezes IGPEnabler=Yes IGPlatformID=01660003 -v (take a look at the screen shot below)

This goes to black screen: GraphicsEnabler=Yes PCIRootUID=0 -v
darkwake=0 didn't change anything...
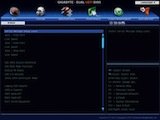
Here is the way the bios is setup:


Any help is most appreciated!!!!!!!
What is interesting is the the ASRock website no longer shows the MacOSX compatible bios as shown above... http://www.asrock.com/mb/Intel/Z87 Extreme4/?cat=Download&os=BIOS
Yes using the 4600 graphics. Monitor plugged into DVI and just updated to the latest ASRock bios that supposedly supports Mac OSX. Have 8GB of ram and a samsung SSD.
This goes to black screen: Try npci=0x3000 or npci=0x2000 or -v -x -f or -F
This freezes IGPEnabler=Yes IGPlatformID=01660003 -v (take a look at the screen shot below)
This goes to black screen: GraphicsEnabler=Yes PCIRootUID=0 -v
darkwake=0 didn't change anything...
Here is the way the bios is setup:
Any help is most appreciated!!!!!!!
Attachments
-
 620.6 KB Views: 435
- Joined
- Feb 3, 2011
- Messages
- 1,403
- Motherboard
- Gigabyte Z390 AORUS Ultra
- CPU
- i9-9900K
- Graphics
- RX 590
it does show on asrock site msr unlocked
2.70 i dl and ran pmpach to to test it is unlocked as they say. i do see
2 mistakes in your bios oc tweaker shared memory should be 32mb also
your ssd is on sata port3 needs to be on sata port0 for osx use flag -x
only for now.
- Joined
- May 11, 2011
- Messages
- 588
- Motherboard
- Asrock B365M Phantom Gaming
- CPU
- i5-8400
- Graphics
- UHD 630 + RX 580
- Mobile Phone
-
Share memory needs to be 64MB.
Also with GraphicsEnabler=Yes PCIRootUID=0 -v ----- if you got a black screen means it boots into mac ---try a hdmi port,plug a cable there when u see the black screen.
Also try GraphicsEnabler=Yes PCIRootUID=1(or 2,3,4) -v
Also with GraphicsEnabler=Yes PCIRootUID=0 -v ----- if you got a black screen means it boots into mac ---try a hdmi port,plug a cable there when u see the black screen.
Also try GraphicsEnabler=Yes PCIRootUID=1(or 2,3,4) -v
matty bad advice asrock has a well known issue with gfx not working with 64mb use 32mb
- Joined
- Jan 18, 2014
- Messages
- 17
- Motherboard
- ASRock Z87 Extreme4 2.70 Bios
- CPU
- i5-4670K
- Graphics
- HD4600
- Mac
-
- Classic Mac
-
- Mobile Phone
-
ALRIGHT!!!! WooohoooO!
Typing this from OS X!!!
DVI would black screen. VGA would give the following screen shot and freeze. HDMI worked!


Audio works - now need to test Sleep. Also USB3 ports do load the usb stick, but how do I know if it is USB3.0 speed?
Typing this from OS X!!!
DVI would black screen. VGA would give the following screen shot and freeze. HDMI worked!
Audio works - now need to test Sleep. Also USB3 ports do load the usb stick, but how do I know if it is USB3.0 speed?
Attachments
-
 599 KB Views: 182
 -
 198 KB Views: 183
- Joined
- Jan 18, 2014
- Messages
- 17
- Motherboard
- ASRock Z87 Extreme4 2.70 Bios
- CPU
- i5-4670K
- Graphics
- HD4600
- Mac
-
- Classic Mac
-
- Mobile Phone
-
Alright sleep and USB 3 do not work...
Using the search for some help, but stehor and mattystonnie you guys sure know your stuff and have unbelievably helpful!!!
Would have given up if it wasn't for you all. Thanks again.
Using the search for some help, but stehor and mattystonnie you guys sure know your stuff and have unbelievably helpful!!!
Would have given up if it wasn't for you all. Thanks again.
- Joined
- Feb 3, 2011
- Messages
- 1,403
- Motherboard
- Gigabyte Z390 AORUS Ultra
- CPU
- i9-9900K
- Graphics
- RX 590
i know u dont have a z77 pro3 but bios settings r the same for the z87 look at my guide maybe u missed a setting http://www.tonymacx86.com/mountain-lion-desktop-guides/96604-guide-asrock-z77-pro3-bios-1-90-patched-2.html#post590710
- Joined
- Jan 18, 2014
- Messages
- 17
- Motherboard
- ASRock Z87 Extreme4 2.70 Bios
- CPU
- i5-4670K
- Graphics
- HD4600
- Mac
-
- Classic Mac
-
- Mobile Phone
-
i know u dont have a z77 pro3 but bios settings r the same for the z87 look at my guide maybe u missed a setting http://www.tonymacx86.com/mountain-lion-desktop-guides/96604-guide-asrock-z77-pro3-bios-1-90-patched-2.html#post590710
Double checked all bios settings and they all match-up...
When the computer goes to sleep, only the monitor goes dark, the computer and fans stay running.
I am not able to get the monitor back on by moving the keyboard or the mouse. (unfortunately have to hold the power button and restart...)
Thanks again for all your continued help.
- Joined
- May 11, 2011
- Messages
- 588
- Motherboard
- Asrock B365M Phantom Gaming
- CPU
- i5-8400
- Graphics
- UHD 630 + RX 580
- Mobile Phone
-
If you got an i5 processor select system definition iMac 14.1 from multi beast (14.2 is for i7)
Go to multi beast ->drivers and select USB 3.0 -Universal install and reboot.
Go to multi beast ->drivers and select USB 3.0 -Universal install and reboot.
- Joined
- Jan 18, 2014
- Messages
- 17
- Motherboard
- ASRock Z87 Extreme4 2.70 Bios
- CPU
- i5-4670K
- Graphics
- HD4600
- Mac
-
- Classic Mac
-
- Mobile Phone
-
Thanks, will try this. When running Multibeast, do I have to re-select all of the prior options, and only change 14.2 to 14.1 or can I just select 14.2 to 14.1 without messing with the other selections.If you got an i5 processor select system definition iMac 14.1 from multi beast (14.2 is for i7)
Go to multi beast ->drivers and select USB 3.0 -Universal install and reboot.
Hope this makes sense. Just want to do it right the first time.
Thanks!
- Joined
- May 11, 2011
- Messages
- 588
- Motherboard
- Asrock B365M Phantom Gaming
- CPU
- i5-8400
- Graphics
- UHD 630 + RX 580
- Mobile Phone
-
- Joined
- Feb 3, 2011
- Messages
- 1,403
- Motherboard
- Gigabyte Z390 AORUS Ultra
- CPU
- i9-9900K
- Graphics
- RX 590
matty please quit posting bad info look yourself at the screenshot at everymac.com
Attachments
-
 118.1 KB Views: 352
- Joined
- May 11, 2011
- Messages
- 588
- Motherboard
- Asrock B365M Phantom Gaming
- CPU
- i5-8400
- Graphics
- UHD 630 + RX 580
- Mobile Phone
-
Speed steeps are working better with 14.1
Also from what you shown me there system definition 14.3 is also good.
Also from what you shown me there system definition 14.3 is also good.
Stehor-----> use system definition mac pro 3.1 for your system and you will have more speed steeps for your cpu.
You got the same specs like me,i build hackintosh for over 5-6 years and i know what i am doing.
You got the same specs like me,i build hackintosh for over 5-6 years and i know what i am doing.
- Joined
- Feb 3, 2011
- Messages
- 1,403
- Motherboard
- Gigabyte Z390 AORUS Ultra
- CPU
- i9-9900K
- Graphics
- RX 590
i didnt say u dont know what u r doing
but giving bad advise on smbios can brick peoples builds. MacPro3,1 apps
r slow or dont work properly this could be solved if there was a
haswell MacMini on the p states issue like in ml. also intel gfx r
supported 32,64,96mb in shared memory. the 64 memory issue maybe fixed
in asrock z87 mobos havent bought 1 to test.
- Joined
- May 11, 2011
- Messages
- 588
- Motherboard
- Asrock B365M Phantom Gaming
- CPU
- i5-8400
- Graphics
- UHD 630 + RX 580
- Mobile Phone
-
I was talking about you to use mac pro
3.1,in the past i was using IMac 12.1 or 12.2 but i had 2 speed
steeps,with mac pro 3.1 system definition i got more speed steeps and
everything works same speed,i tried mac mini 5.2 or 5.1 but the usb 3
doesn't work also my cpu is locked at 34.
I got the same system specs like you.
With Chimera i can use even 32,64 or 1024mb for video in the bios,but with chameleon i can only stick with 32,64,96mb.
I got the same system specs like you.
With Chimera i can use even 32,64 or 1024mb for video in the bios,but with chameleon i can only stick with 32,64,96mb.
- Joined
- Jan 18, 2014
- Messages
- 17
- Motherboard
- ASRock Z87 Extreme4 2.70 Bios
- CPU
- i5-4670K
- Graphics
- HD4600
- Mac
-
- Classic Mac
-
- Mobile Phone
-
With 14.1 the computer goes to sleep
(fans turn off) and I can wake it up as well with the keyboard, but the
monitor stays black...forcing me to restart by holding down the power
button.
This is with the HD4600 hooked up through HDMI.
My hope is that installing an EVGA GTX 760 may help (but of course I have run into more problems)
I changed the bios to PCI and disabled onboard video, but now OS X hangs "missing bluetooth controller".
I have tried GraphicsEnabler=No and GraphicsEnabler=Yes with no luck. I can safe boot with -x though.
I am sure I am wearing you guys out, but I really do appreciate it and hope that others are getting something out of this thread. Thanks again!
- Joined
- May 11, 2011
- Messages
- 588
- Motherboard
- Asrock B365M Phantom Gaming
- CPU
- i5-8400
- Graphics
- UHD 630 + RX 580
- Mobile Phone
-
If you disabled the onboard video you
need 2 boot with this: -v IGPEnabler=No GraphicsEnabler=Yes
PCIRootUID=1 (because on board video is PCIRootUID=0)
If you want 2 enable both of them -v IGPEnabler=Yes GraphicsEnabler=Yes
If you want 2 enable both of them -v IGPEnabler=Yes GraphicsEnabler=Yes
- Joined
- Jan 18, 2014
- Messages
- 17
- Motherboard
- ASRock Z87 Extreme4 2.70 Bios
- CPU
- i5-4670K
- Graphics
- HD4600
- Mac
-
- Classic Mac
-
- Mobile Phone
-
If you disabled the onboard video you need 2 boot with this: -v IGPEnabler=No GraphicsEnabler=Yes PCIRootUID=1 (because on board video is PCIRootUID=0)
If you want 2 enable both of them -v IGPEnabler=Yes GraphicsEnabler=Yes
Tried all of the boot flags above, but still unsuccessful. Changed back to 'onboard' and have no trouble loading into Mavericks. Thoughts?
Screenshots:


- Joined
- May 11, 2011
- Messages
- 588
- Motherboard
- Asrock B365M Phantom Gaming
- CPU
- i5-8400
- Graphics
- UHD 630 + RX 580
- Mobile Phone
-
I think its working because you can test cinebench.
By your geekbench score and cinebench everything is fine,sleeps works?
By your geekbench score and cinebench everything is fine,sleeps works?
- Joined
- Mar 5, 2014
- Messages
- 6
- CPU
- 4670k
- Graphics
- EVGA gtx980
- Mac

- Mobile Phone
-
Hello;
which guide did you ise while building that hackintosh? I have the same mb and i am stuck
which guide did you ise while building that hackintosh? I have the same mb and i am stuck
Sleep does work!
cydonianknight - I used this guide: http://www.tonymacx86.com/374-unibeast-install-os-x-mavericks-any-supported-intel-based-pc.html
Try using HDMI rather than DVI or VGA if you are using onboard graphics. Let me know where you get stuck.
Read throught this thread as it details how mattystonnie and stehor helped me.
- Joined
- Jul 18, 2012
- Messages
- 16
- Motherboard
- Mavericks 10.9.1
- CPU
- ASRock Fatal1ty Z87 Professional
- Graphics
- ASUS - GTX 680 2gb
- Mac
-
- Classic Mac
-
- Mobile Phone

I've fixed bluetooth error before by simply deleting all graphics drivers my system wasn't actually using an it fixed it, just make sure yo get them all.With 14.1 the computer goes to sleep (fans turn off) and I can wake it up as well with the keyboard, but the monitor stays black...forcing me to restart by holding down the power button.
This is with the HD4600 hooked up through HDMI.
My hope is that installing an EVGA GTX 760 may help (but of course I have run into more problems)
I changed the bios to PCI and disabled onboard video, but now OS X hangs "missing bluetooth controller".
I have tried GraphicsEnabler=No and GraphicsEnabler=Yes with no luck. I can safe boot with -x though.
I am sure I am wearing you guys out, but I really do appreciate it and hope that others are getting something out of this thread. Thanks again!

UniBeast is a tool that creates a bootable installer out of your downloaded version of OS X. In order to start fresh, you'll need access to a functional computer running Mac OS X Snow Leopard 10.6.8 or later. This is a requirement, as you need access to the Mac App Store to download OS X and create the installation drive. To start from scratch, booting the 10.6 Snow Leopard Retail DVD directly, check out iBoot + MultiBeast.
UniBeast Overview
1. Download the OS X Mavericks Application from the Mac App Store
2. Prepare a UniBeast USB flash drive
3. Install OS X Mavericks
4. Install the bootloader and drivers using MultiBeast
Before You Begin
1. Register here at tonymacx86.com. If you don't have a user account, create one!
2. Get our latest MultiBeast and UniBeast tools from the downloads section.
3. Purchase a 8GB or larger USB drive.

The full operating system is a free download for anyone who has purchased Mac OS X Snow Leopard, Lion, or Mountain Lion. Download the Application from the Mac App Store using your Apple ID on any Mac or functional computer running Mac OS X 10.6.8 or later.
1. Open Mac App Store
2. Log in with your Apple ID
3. Download OS X Mavericks
The Application Install OS X Mavericks will appear in /Applications.

Take a deep breath and take your time- this is pretty simple, but it's easy to miss things if you rush. Follow each step to the letter.
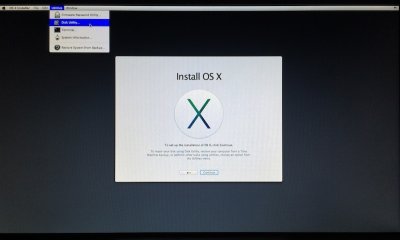
1. Insert the USB drive
2. Open /Applications/Utilities/Disk Utility
3. Highlight the USB drive in left column
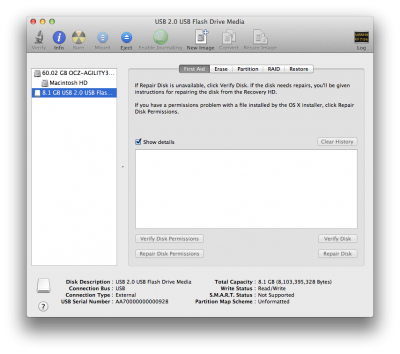
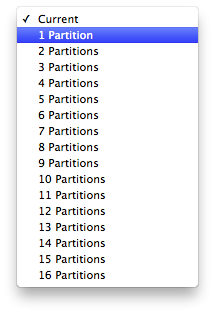
5. Click Current and choose 1 Partition
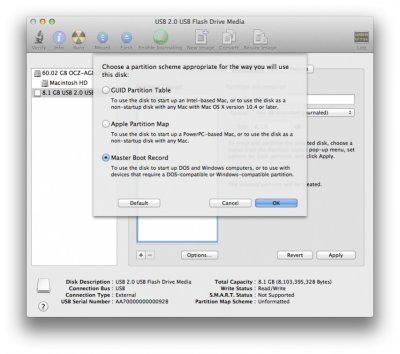
7. Choose Master Boot Record
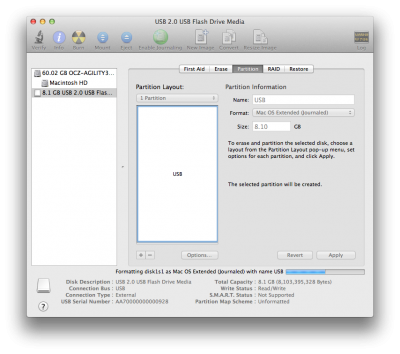
9. Under Format: choose Mac OS Extended (Journaled)
10. Click Apply then Partition
12. Click Continue, Continue, Continue, Agree
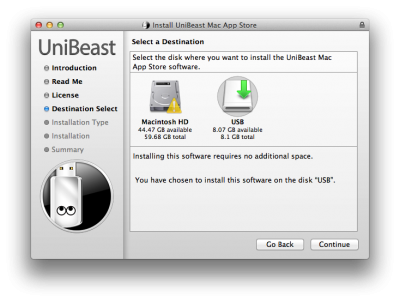
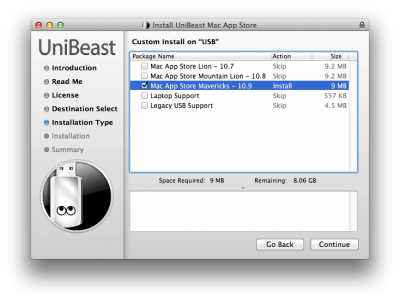
15. If using a laptop, choose Laptop Support
16. Click Continue
17. Enter password and click Install
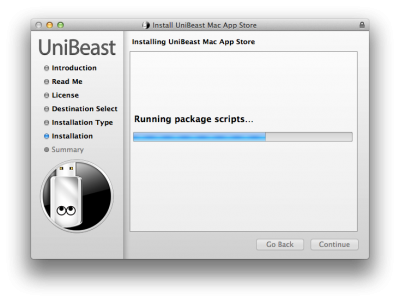
18. Drag MultiBeast to your completed USB drive.
If you're installing on a recommended CustoMac desktop with AMI UEFI, the options are simple. For other systems make sure to set your BIOS or UEFI to Optimized Defaults, and your hard drive to AHCI mode. Award BIOS settings are listed here.
1. To access BIOS/UEFI Setup, press and hold Delete on a USB Keyboard while the system is booting up
2. Set to Optimized Defaults.
3. (Optional) Set X.M.P. Memory Profile to Profile1
4. If your CPU supports VT-d, disable it
5. Save and exit.
For best results with the latest 8-series motherboards and Haswell CPUs, remove all but 1 stick of RAM for the installation process. You can put back extra RAM sticks after post-installation is finished.
You're almost done! All you need to do is boot from the USB drive and install!
1. Turn on the computer
2. Press the hotkey to choose boot device
- If you have a Gigabyte motherboard press F12
- If you have a ASUS motherboard, press F8
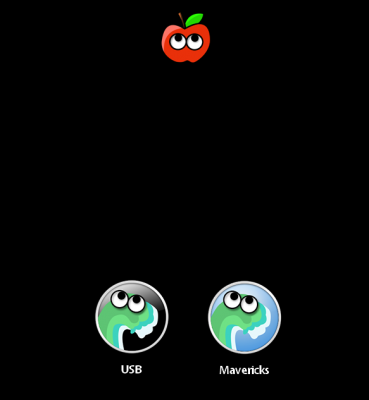
4. At the Chimera Boot Screen, choose USB and hit Enter


5. When you arrive at the Installer, choose language.

6. For a new installation of OS X, you MUST erase and format the destination drive according to the following steps before continuing. If you are upgrading from Snow Leopard, Lion, or Mountain Lion and you want to keep your files and apps, skip steps a-j.
a. In the top menu bar choose Utilities, and open Disk Utility
b. Highlight your target hard drive for the Mavericks installation in left column.
c. Click Partition tab
d. Click Current and choose 1 Partition
e. Click Options...
f. Choose GUID Partition Method
g. Under Name: type Mavericks (You can rename it later)
h. Under Format: choose Mac OS Extended (Journaled)
i. Click Apply then Partition
j. Close Disk Utility
c. Click Partition tab
d. Click Current and choose 1 Partition
e. Click Options...
f. Choose GUID Partition Method
g. Under Name: type Mavericks (You can rename it later)
h. Under Format: choose Mac OS Extended (Journaled)
i. Click Apply then Partition
j. Close Disk Utility
7. When the installer asks you where to install, choose Mavericks, or your existing install.
8. Upon completion, restart the system.

MultiBeast is an all-in-one post-installation tool designed to enable boot from hard drive, and install support for Audio, Network, and Graphics. In addition it includes System Utilities to repair permissions and a collection of drivers and config files. The installation is complete, but the drive isn't bootable yet. Boot from the USB again, this time choosing Mavericks.
1. Turn on the computer
2. Press the hotkey to choose boot device
- If you have a Gigabyte motherboard press F12
- If you have a ASUS motherboard, press F8
4. At the Chimera Boot Screen, choose your new Mavericks installation.
6. Open and run Multibeast
 7. Click Quick Start to choose EasyBeast, UserDSDT, or DSDT-Free
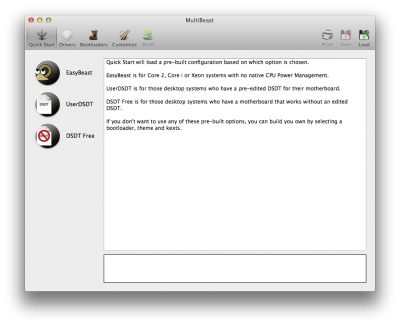
11. Click Build then Install
If you've had success using this guide, consider a contribution to help keep the sites going. We're constantly updating and tweaking our tools to help you. Good luck and have fun!
Related:
UniBeast 10.8 Mountain Lion Guide
UniBeast 10.7 Lion Guide
iBoot + MultiBeast - 10.6 Snow Leopard Guide
Simplest OS X Installation Guide
Quick guide to configuring the UEFI on Gigabyte's 7-series LGA-1155 motherboards
Troubleshooting and Optimizations:
boot0 Error: The Official Guide
How to Fix iMessage
Mavericks: Native CPU/IGPU Power Management
Issuing Boot Flags
How To Know What to Install With MultiBeast
Install Bootloader and Extra to EFI Partition
Chimera HD Graphics Bootflags: IGPEnabler, IGPlatformID, and IGPDeviceID
The Basics
HDMI Audio
tonymacx86 Search
tonymacx86 Wiki
